Hosting a static site quickly as a Tor hidden service with docker-compose

This sample bakes a private key into the resulting docker image that contains the Tor daemon. The only thing you need to edit are args and volumes in docker-compose.yml.

docker-compose.yml:

1
2
3
4
5
6
7
8
9
10
11
12
13
14
15
16
17
18
19
20
21
22
23
version: "3"
services:
hidden_service:
# we want to pass in the details of our hs AT BUILD TIME..
build:
context: .
dockerfile: Dockerfile.hidden_service
args:
TARGET_PORT: 8123
ONION_HOSTNAME: abcdefghijklmnop.onion
ONION_PRIVATE_KEY: -----BEGIN RSA PRIVATE KEY-----\nMIIC[REDACTED]\n...\n...\n-----END RSA PRIVATE KEY-----
restart: always
web_host:
image: nginx:alpine
volumes:
- "~/my/static_site:/usr/share/nginx/html"
ports:
- "8123:80"
restart: always

ONION_PRIVATE_KEY is what belongs in /var/lib/tor/hidden_service/private_key, ONION_HOSTNAME is what belongs in /var/lib/tor/hidden_service/hostname.

Dockerfile.hidden_service

1
2
3
4
5
6
7
8
9
10
11
12
13
14
15
16
17
18
19
20
21
22
23
24
25
26
27
28
29
30
31
32
33
FROM alpine:latest
ARG TARGET_PORT
ARG ONION_HOSTNAME
ARG ONION_PRIVATE_KEY
RUN apk update && apk add bind-tools && apk add curl && apk add \
tor \
--update-cache --repository http://dl-3.alpinelinux.org/alpine/edge/testing/ \
&& rm -rf /var/cache/apk/*
EXPOSE 9050
RUN mkdir -p /etc/tor
RUN chown -R tor /etc/tor
RUN echo $'HiddenServiceDir /var/lib/tor/hidden_service \n\
HiddenServicePort 80 web_host:80' > /etc/tor/torrc
run mkdir -p /var/lib/tor/hidden_service
run chmod 700 /var/lib/tor/hidden_service
RUN echo -e $ONION_PRIVATE_KEY > /var/lib/tor/hidden_service/private_key
# RUN cat /var/lib/tor/hidden_service/private_key
RUN chmod 600 /var/lib/tor/hidden_service/private_key
RUN echo ${ONION_HOSTNAME} > /var/lib/tor/hidden_service/hostname
run chown -R tor /var/lib/tor/hidden_service
USER tor
ENTRYPOINT [ "tor" ]
CMD [ "-f", "/etc/tor/torrc" ]

Dockerfile.web_host

1
FROM nginx:alpine

Copy these three into a folder, then do docker-compose up from within said folder.

nVidia CUDA samples on Ubuntu 16.04 LTS

Here they are in case anyone else needs to download them separately (and the rest of cuda-repo-ubuntu1504-7-5-local_7.5-18_amd64.deb):

https://drive.google.com/open?id=0B_SnrcTvZzIXX2dkM0pwT2E3U2s
https://mega.nz/#F!dVBghK7J!6nvh-XvvoiqqeGp144jouw

The file you’re looking for is var/cuda-repo-7-5-local/cuda-samples-7-5_7.5-18_amd64.deb

To extract and compile the samples (make sure you have your nVidia GPU active if you’re using Optimus, e.g. by using

sudo prime-switch nvidia

or otherwise;

nvidia-smi

should show your GPU’s details.

1
2
3
4
ar x cuda-samples-7-5_7.5-18_amd64.deb
tar -xf data.tar.gz
cd /usr/local/cuda-7.5/samples/5_Simulations/smokeParticles/
CUDA_PATH=/usr CUDA_SEARCH_PATH=/usr/lib/x86_64-linux-gnu/ make -j5

First Foray into MIPS Assembly

Task: Print Hello World 10 times.

1
2
3
4
5
6
7
8
9
10
11
12
13
14
15
16
17
18
19
20
21
.data
hello_str: .asciiz "Hello World!n"
.text
.globl main
main:
subu $sp, $sp, 4 # create a word on the stack
sw $ra, 4($sp) # store the return address
# put main function code here
li $t0, 10 #the number at which we want to end our loop.
li $t1, 0 #start counting from 0; we are going to increment this counter 10 times.
li $v0, 4 # set $v0 to print_string; http://courses.missouristate.edu/kenvollmar/mars/Help/SyscallHelp.html
la $a0, hello_str # load the string
loop:
beq $t1, $t0, end # if t1 == 10 we are done
syscall # execute the function described by
addi $t1, $t1, 1 # add 1 to t1
j loop # jump back to the top
end:
li $v0, 10
syscall

recorded_compressed

Concatenating FLV files with ffmpeg

How to fix popping on audio start/stop/resume with Intel HDA audio in Linux

https://wiki.archlinux.org/index.php/Alsa#Pops_when_starting_and_stopping_playback My ears were nearly wrecked by this awfulness. On a side note, the Conexant Audio CX20751/2 isn’t the best integrated sound card around. Even lowly Realteks have far better dynamic range and equalization. There is virtually no soundstage, mids are very muffled, even with headphones. It can be found on some lower end Thinkpads (e.g. S440/E440); considering that these are cheap SMB laptops it’s not surprising that they had to cut corners somewhere.

Another alternative to checkinstall

Checkinstall didn’t work for me in CentOS 7 even after following this guide: http://www.patrickmin.com/linux/tip.php?name=checkinstall_fedora_13 and using –fstrans = no. Solution: https://github.com/jordansissel/fpm Using nginx 1.7.3 as an example:

1
2
3
4
5
6
7
8
9
10
11
12
13
14
$ ./configure --sbin-path=/usr/local/sbin/nginx --with-http\_ssl\_module --prefix=/usr/local/nginx
$ make install DESTDIR = /tmp/nginxinstalldir && cd /tmp/nginxinstalldir
$ fpm -s dir -t rpm -n nginx -v 1.7.3 -d 'openssl-devel' -d 'openssl-libs' -d 'openssl' -d 'pcre' -d 'pcre-devel' -d 'zlib' -d 'zlib-devel' usr/
# rpm -qpR nginx-1.7.3-1.x86_64.rpm
openssl-devel
openssl-libs
openssl
pcre
pcre-devel
zlib
zlib-devel
rpmlib(PayloadFilesHavePrefix) <= 4.0-1
rpmlib(CompressedFileNames) <= 3.0.4-1
# rpm -ivh nginx-1.7.3-1.x86_64.rpm

Of course, this is by no means a substitute to properly packaging packages for upstream using rpm-build, but it is perfect for compiling from source quickly without having files strewn all over the place, especially when there is no make uninstall.

GNU Screen on Steroids

Note: This is an old post, from an old blog far, far away Append this to your ~/.bashrc:

1
2
3
case "$TERM" in
screen*) PROMPT_COMMAND='echo -ne "�33k�33�134"'
esac

and this to your .screenrc:

1
2
hardstatus alwayslastline '%{= G}\[ %{G}%H %{g}\]\[%= %{= w}%?%-Lw%?%{= R}%n*%f %t%?%{= R}(%u)%?%{= w}%+Lw%?%= %{= g}\]\[ %{y}Load: %l %{g}\]\[%{B}%Y-%m-%d %{W}%c:%s %{g}\]'
shelltitle '$ |bash'

Courtesy of http://superuser.com/questions/244299/gnu-screen-how-to-update-dynamically-the-title-of-a-window and http://beerpla.net/2009/10/06/supercharge-your-gnu-screen-with-a-power-taskbar-and-never-feel-lost-again/

If you want to keep your splits/panes persistent even when you detach: The short is answer is that you can’t. The longer answer is that you can fake it. (Note: the next screen release, probably numbered 4.1.0, will be able to remember display layouts.) Splits are a property of your display. The process managing your screen session doesn’t really know about them; only the single process that’s displaying the session does. Thus, the screen session can’t remember the splits because it doesn’t know about them, and once you detach, the process that did know about them has exited. The hack is to use nested screen sessions. Start one session and give it some escape sequence that you won’t use much (or just disable its escape character completely). Bind your usual detach key sequence to this screen session. Now, start or attach to your main screen session. All of your work will be done in the inner session, and you can split your display. When you detach, however, it will be the outer session that detaches, so your splits in the inner session will be preserved.
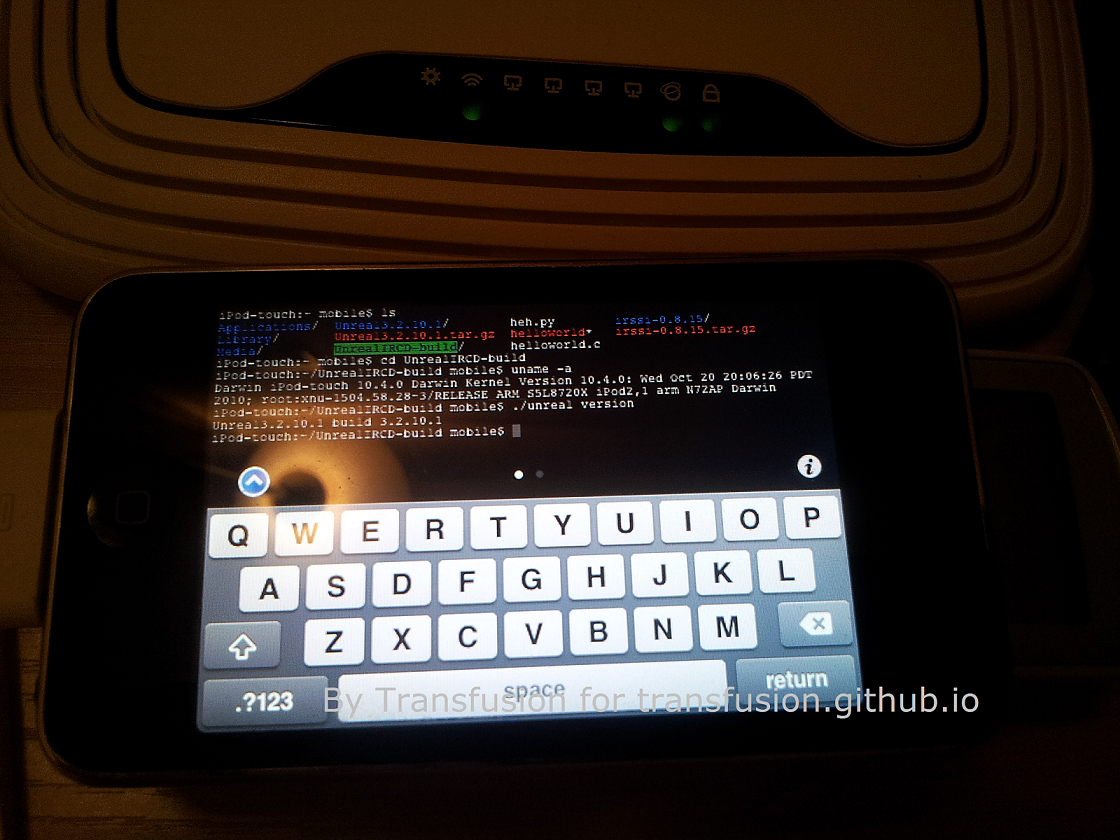
http://aperiodic.net/screen/faq#when_i_split_the_display_and_then_detach_screen_forgets_the_split

Compiling UnrealIRCD on an iPod Touch 2G

Note: This is an old post, from an old blog far, far away

Prerequisites

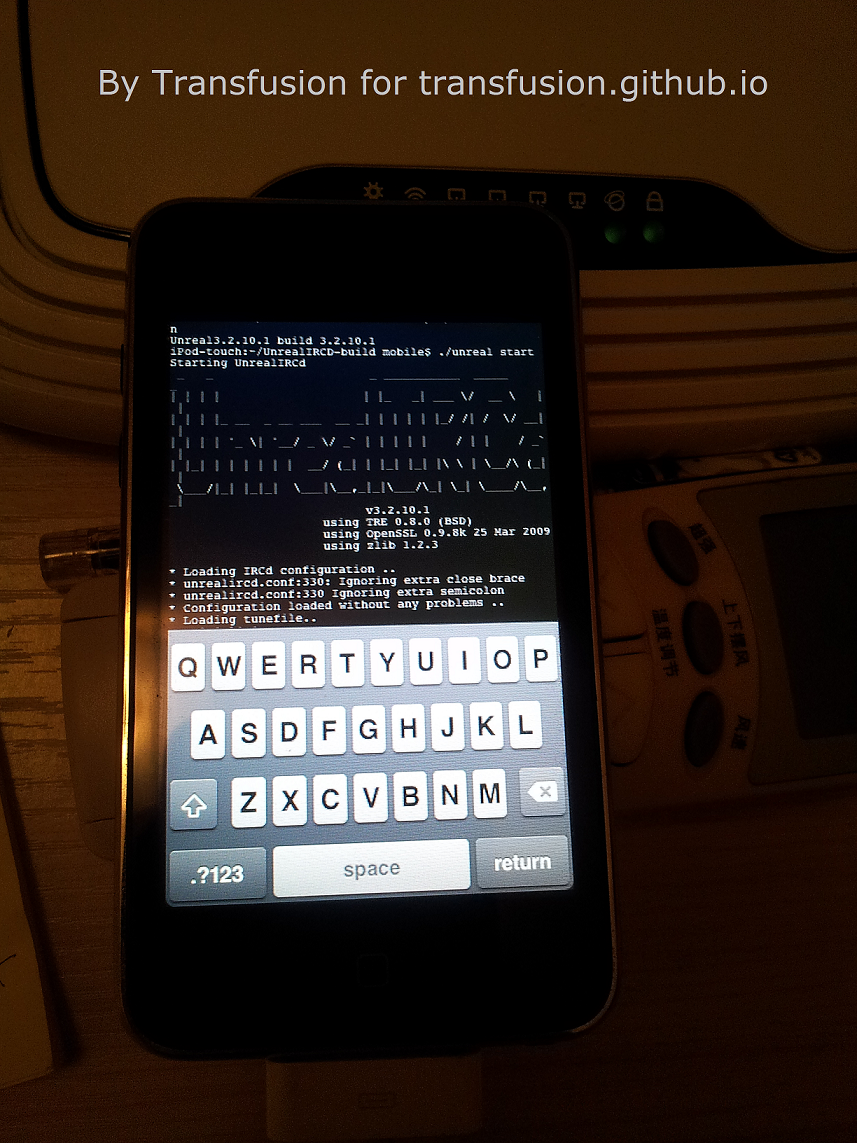
wget "http://www.unrealircd.com/downloads/Unreal3.2.10.1.tar.gz" | tar -xvzf -

Configuring

For some reason I had to run the ./configure as root after cd’ing into the directory where I extracted the files as the mobile user; perhaps due to an inability to run unsigned applications?

checking whether we are cross compiling… configure: error: in /var/mobile/Unreal3.2.10.1': configure: error: cannot run C compiled programs. If you meant to cross compile, use–host’.

After running as root, everything went rather smoothly. Edit dpath and spath as you wish.

1
./configure --with-showlistmodes --enable-ssl --enable-ziplinks --enable-inet6 --with-listen=5 --with-dpath=/var/mobile/UnrealIRCD-build --with-spath=/var/mobile/UnrealIRCD-build/src/ircd --with-nick-history=2000 --with-sendq=3000000 --with-bufferpool=18 --with-permissions=0600 --with-fd-setsize=1024 --enable-dynamic-linking

I forgot to use ‘time’ but estimate it perhaps took around 20 minutes. After make && make install:

1
2
3
openssl genrsa -out server.key 2048
openssl req -new -x509 -key server.key -out server.cert.pem -days 1826
cp server.key server.key.pem

to generate the certificate and key needed for the SSL connection. After running ./unreal start ; it required some source modules in the build folder and the config file for the IRCD.

1
2
cp -r /var/mobile/Unreal3.2.10.1/src/ ../UnrealIRCD-build/
cp /var/mobile/UnrealIRCD-build/src/example.conf /var/mobile/UnrealIRCD-build/unrealircd.conf

Edit the config file as you wish!…

On calling su in an Android App

http://su.chainfire.eu/#how I noticed that https://github.com/koush/Superuser‘s su binary requires quotes around the target command, or else it won’t execute properly.

1
2
3
4
5
6
7
8
9
u0_a156@aries:/ $ su -c ping 8.8.8.8
su -c ping 8.8.8.8
Unknown id: 8.8.8.8
u0_a156@aries:/ $ su -c "ping 8.8.8.8"
su -c "ping 8.8.8.8"
PING 8.8.8.8 (8.8.8.8) 56(84) bytes of data.
64 bytes from 8.8.8.8: icmp_seq=3 ttl=39 time=262 ms
64 bytes from 8.8.8.8: icmp_seq=5 ttl=39 time=271 ms

The “solution” is to write the intended su -c command to a shell script file and then call it with ProcessBuilder:

1
2
3
4
5
6
7
8
9
10
11
12
13
14
15
16
17
18
19
20
21
try {
String samplePingCommand = new String("su -c ""+"ping 8.8.8.8"+""");
FileOutputStream fOut = getActivity().openFileOutput("test_ping.sh", MODE_WORLD_READABLE);
OutputStreamWriter osw = new OutputStreamWriter(fOut);
osw.write(samplePingCommand);
osw.flush();
osw.close();
ProcessBuilder testPingCommand = new ProcessBuilder("sh", getActivity().getFilesDir()+"/test_ping.sh");
testPingCommand.redirectErrorStream(true);
Process startTestPingCommand = testPingCommand.start();
BufferedReader testPingCommandOut = new BufferedReader(new InputStreamReader(startTestPingCommand.getInputStream()));
String testPingCommandSingleLine;
while ((testPingCommandSingleLine = testPingCommandOut.readLine()) != null) {
/*Log.e("Ping Command Output", testPingCommandSingleLine); */
}
catch (Exception e) {
Log.e("Ping Command", "Error", e);
}

Compiling http://www.darwinsys.com/file/ for Android

Cross compiling is always a PITA, so here goes:

1
2
3
4
5
6
7
8
9
10
11
12
13
AR=arm-linux-androideabi-ar
OLDPWD=/home/transfusion/android-bash/fileutil
LD_LIBRARY_PATH=/home/transfusion/android-ndk-r9c/platforms/android-18/arch-arm/usr/lib/
PATH=/home/transfusion/android-ndk-r9c/toolchains/arm-linux-androideabi-4.8/prebuilt/linux-x86_64/bin:/usr/local/sbin:/usr/local/bin:/usr/sbin:/usr/bin:/sbin:/bin:/usr/games:/usr/local/games
LD=arm-linux-androideabi-ld
PWD=/home/transfusion/android-bash/fileutil/bin
STRIP=arm-linux-androideabi-strip --strip-unneeded
CXX=arm-linux-androideabi-g++
CFLAGS=-L/home/transfusion/android-ndk-r9c/platforms/android-18/arch-arm/usr/lib/ --sysroot=/home/transfusion/android-ndk-r9c/platforms/android-18/arch-arm/ -I/home/transfusion/android-ndk-r9c/platforms/android-18/arch-arm/usr/include/
RANLIB=arm-linux-androideabi-ranlib
ANDROID_NDK=/home/transfusion/android-ndk-r9c
CC=arm-linux-androideabi-gcc
READELF=arm-linux-androideabi-readelf

I have android-ndk-r9c extracted to my home directory.

1
2
3
4
5
6
cd file-5.11
cd src
ln -s $ANDROID_NDK/platforms/android-19/arch-arm/usr/lib/crtend_so.o
ln -s $ANDROID_NDK/platforms/android-19/arch-arm/usr/lib/crtbegin_so.o
./configure --prefix=/home/transfusion/file-android-build --host=arm-linux ---datarootdir=/system/share
make && make install

See https://stackoverflow.com/questions/6881164/crtbegin-so-o-missing-for-android-toolchain-custom-build as to why those two files need to be linked. The magic.mgc file is going to be placed in /system/share/misc/magic on the device. Copy all the files into /system on the device, and create the symlink to libmagic.so in /system/lib if it hasn’t been created

1
2
cd /system/lib
ln -s libmagic.so.1.0.0 libmagic.so.1

If all works well,

1
2
$ file /system/bin/file
/system/bin/file: ELF 32-bit LSB executable, ARM, version 1 (SYSV), dynamically linked (uses shared libs), not stripped
Your browser is out-of-date!

Update your browser to view this website correctly. Update my browser now

×